How to use a trackpad or mouse with your iPhone or iPad

For some, the iPad is our primary computer instead of a laptop. Apple made this possible with support for keyboards and, since iPadOS 13.4, external trackpads and mice. With such capabilities, your best iPad is closer than ever to a whole laptop experience.
Here's how you can get set up with your favorite mouse or trackpad with your current iPad or even iPhone.
How to pair a mouse or trackpad to your iPad
The first thing you'll want to do is connect your mouse or trackpad to your iPad. You can also use a wire by plugging it into the iPad port. Here's what you do for pairing a Bluetooth mouse or trackpad, such as the Magic Trackpad 2.
- Put your mouse or trackpad into pairing mode by following the manufacturer's procedure.
- Open Settings on your iPad.
- Tap Bluetooth.
- Tap your mouse or trackpad under Other Devices.

Your pointing device will now be paired with your iPad.
How to manage pointer settings on iPad
Once you're mouse or trackpad is connected, you can manage some of the available settings.
- Open Settings.
- Tap General if Settings doesn't open on that tab.
- Tap Trackpad or Trackpad & Mouse (depending on what pointer device is connected.

- Drag the slider to change the tracking speed of your pointing device.
- Tap the switch next to Natural Scrolling to turn natural scrolling (scroll down by swiping up, scroll up by swiping down, basically, the way scrolling works when you're touching your iPad's screen with your fingers) on or off.

- Tap the switch next to Tap to Click if it's available to enable or disable that feature. Generally only present for trackpads.
- Tap the switch next to Two Finger Secondary Click if it's available to enable or disable that feature.

How to enable AssistiveTouch on iPhone and iPad
If you enable AssistiveTouch, you can do even more with your trackpad or mouse. Here's how to get that set up.
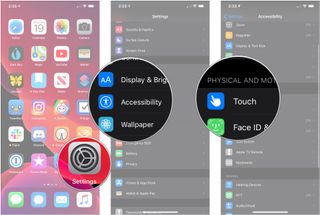
- Open Settings on your iPhone or iPad.
- Tap Accessibility.
- Tap Touch under Physical and Motor.

- Tap AssistiveTouch.
- Tap the switch next to AssistiveTouch so it's in the green 'on' position.

How to connect a Bluetooth mouse to your iPhone or iPad with AssistiveTouch
You can use a Bluetooth mouse with your iPhone or iPad, as long as it's not an Apple Magic Mouse.
Master your iPhone in minutes
iMore offers spot-on advice and guidance from our team of experts, with decades of Apple device experience to lean on. Learn more with iMore!
- Open Settings on your iPhone or iPad.
- Tap Accessibility.
- Tap Touch under Physical and Motor.

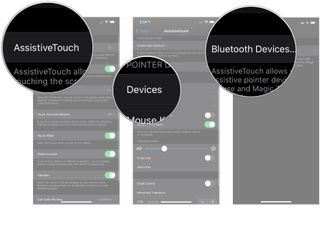
- Tap AssistiveTouch.
- Tap Devices.
- Tap Bluetooth Devices…

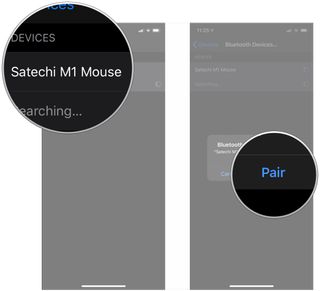
- Put your Bluetooth mouse into pairing mode.
- Tap the name of your mouse when it appears on the menu in your iPad.
- Tap Pair. Your mouse will now connect to your iPad.

Once connected, your mouse should be good to go. You'll see a circular cursor appear on your device's screen. To use the cursor, move your mouse to drag the cursor over something you want to click, then click on your mouse.
Connecting a wired mouse or Magic Trackpad 2
If you want to connect a wired mouse or a Magic Trackpad, it's a simple matter of physically connecting a cable to your iPhone or iPad, whether you use Lightning or USB-C. For example, if you want to connect an Apple Magic Trackpad 2 to your 2021 iPad Pro, you'll need a USB-C-to-Lightning cable, as the Magic Trackpad 2 has a Lightning port.
Once you've connected your pointing device with your iPhone or iPad, you don't need to do anything other than turn AssistiveTouch on.
How to customize the buttons on your pointing device
- Open Settings on your iPhone or iPad.
- Tap Accessibility.
- Tap Touch under Physical and Motor.

- Tap AssistiveTouch.
- Tap Devices.
- Tap the name of your pointing device.

- Tap the labels reading Button 1, Button 2, etc., to customize what each button does.
- Tap the action you each button on your pointer to control when it's pressed. The options range from simple actions such as single-tapping to opening the dock. If you have any, you can assign a particular Siri Shortcut to one of your mouse buttons.

- Tap the name of your pointer device in the upper-left corner of the menu pane.
- Tap Customize Additional Buttons…

- Click a button on your mouse to customize its function on iOS or iPadOS.
Always stay productive
As you can see, connecting your favorite mouse or trackpad to your current iPad or even iPhone, like the iPhone 13 Pro, is an easy task. With a mouse or trackpad, it's easier than ever to navigate your device like a computer. And if you have an M1 iPad, it'll be even better once iPadOS 16 rolls around in the fall.
Updated June 2022: These steps have been updated for the latest versions of iOS and iPadOS.
Joseph Keller is the former Editor in Chief of iMore. An Apple user for almost 20 years, he spends his time learning the ins and outs of iOS and macOS, always finding ways of getting the most out of his iPhone, iPad, Apple Watch, and Mac.

Apple's iPhone 16 could finally get the capacitive buttons that the iPhone 15 missed out on with a supplier now lined up

An Apple Vision Pro headset helped this Brazilian surgeon repair an injured shoulder like never before

Apple's being forced to add Google Pay to iPhones in the EU — but no one should downgrade their mobile wallet, believe me I've tried
Most Popular


